Tampilkan postingan dengan label Gadget. Tampilkan semua postingan

Sabtu, 14 April 2012

Create a Simple Teleprompter

It is possible to build a teleprompter works with your home computer, some software, a cable and a monitor is similar to the teleprompters used by professional television new anchors and politicians. The notable difference is that your screen teleprompter will be next to the camera, then only a professional screen teleprompter uses the one-way glass and is actually placed in front of the camera.

Will need things You : Teleprompter software Monitor with VGA, VGA cable

1. download or purchase software teleprompter. This is a program that will scroll your text to the screen so you can read the words while you appear on camera. There are several programmes of sale, but why pay for one when you can download a free program called prompter  "Prompt! "? A link is provided in the resources section.


2. Install the software teleprompter on your computer and enter the text you want to read out your teleprompter. Write your text in a familiar tone with short sentences and active verbs. Many texts that sound when read you yourself don ' t sound so good when read you aloud.


3. find a monitor with a VGA input. This can be a computer monitor or television. Should be on the side, at least 13 inches wide. Place this just below the camera monitor. If you use a small portable camera and a large monitor, you can insert the camera monitor.


4. we have a long VGA cable, which can stretch from your computer to the monitor. If your computer is in addition to a monitor, you will need about still-foot VGA cable. Connect one end to the VGA output on your computer and the other end into the monitor. You can use your portable computer how to start the reader program and act as the monitor. It will save you the trouble of setting up your monitor and using a cable. However, the portable computer screen have tended to be small. If the words are too small for you to see, then the reader you use.


5. position yourself from a teleprompter and cameras at least 10 feet because teleprompter at langklong. You're actually looking at the camera when you're saving this if you are too close to the teleprompter is farther than it would be noticed.

Read More >>

Jumat, 13 April 2012

The Importance of Lighting in Film Production

Film has integrated the various elements of the story to change the script of life in a story on the screen. Among the technical elements - sound, lighting and editing - the lighting is a special role. In theater, the audience views the motion picture with synchronized audio track. All visual impressions on the viewer depends on how the proper lighting.

Although you can choose from a variety of kits available on the market of lighting conditions, but some of the basics, you can also build a working light kit using components commonly available and inexpensive. From a local hardware store you can buy the lights of metal reflectors, which are used in repair shops. These can be hung on a clip closed, and portable. You can use the bulbs the desired effect and color them.

The other extension is very useful, you must have a good stock of them. You need it, almost everywhere, but especially for lighting. You can also have an adjustable, said three-feet. These can be used to mount clips or lights with light diffusers. To have a white board to balance the white light, while the film will be something else useful to do. These can also be used as reflectors to bounce light on an object.

The last item in your toolbox will be a light diffuser. It is a kind of white see-through thin. To shed light on this issue on one side and diffuse, or shall we say, "spread" the light coming from the other side and the brightness. With this technique, the object does not seem too bright or "hot".
You should be aware that no light is always white and have different colors. Normally, you will discover when you begin using the camera. For example, if you draw a night in a room that has a tungsten bulb, the movie will be yellow. Similarly, the fluorescent light gives green. If you pull out, the effect of light is blue, especially if you shoot in a shadow.

If you want an impressive effect of natural light, hit the target when the sun goes down. The light at this time gives a wonderful light caramel color. But you have only minutes to complete your shot before the sun goes down. However, if you're smart and keep ready, you can take great pictures. You can use this time for your filming activities, particularly in the latter part of months of spring or summer of the year.

You might also like to learn the basics of 3-point lighting standards in place that is the standard technique used by camera men and photographers. As its name suggests, uses three lights for different purposes: the light shines first or main object is deleted the second light in the shadow of the first light, and a third light is used behind the subject to the incorporation of the dimension of object. You can adjust the lights to achieve the desired result you want. This technique of birth to three points, is widely used in different ways. So you may want to practice this technique and see how it works.

Read More >>

Senin, 12 Maret 2012

Parts of The DSLR Camera.

Hello beraudiovisual's friends. This time I will discuss in simple terms and the parts contained DSLR camera. DSLR cameras are digital single lens reflex, meaning is a camera with a digital system (using the processor, chip, memory, and technological sophistication in capturing the image) that uses one lens mounted on the camera body. Reflex mirror inside the camera will go up when you press the shutter button and when the image sensors inside cameras will record an image. It may also said to the camera with the operating system such as komputer. There are parts of DSLR cameras.
1. Eyepiece (base currency) = holder for our eyes while looking into the viewfinder.
2. Viewfinder (viewfinder) = viewfinder using the method pentaprisma (pentagon shape) which is placed above the optical path through the lens to the image sensor plate. incoming light then reflected upward by a mirror (mirror reflection) and the pentaprisma. pentaprisma then reflects light several times through the viewfinder (viewfinder). When the shutter button is released, the glass opens the way for the light so that light can directly on the image sensor.
3. Image sensor (sensor image capture) = a sensor that is used to process and capture an image contained in a camera. size there are a variety of sensors, ie APS-C sized 15x23mm, 19x29mm APS-H size, and FULL-FRAME 24x36mm (with large size movie).
4. Flash (light like blits) = flash is usually used to help us in taking photographs in the dark.
5. Hotshoe (flash external holder) = a holder for an external flash that is usually located in the middle of the camera body. 6. Lens (lens) = a lens mount that is embedded in the camera body (lens body can be removed and replaced dr) that serves to focus the light to be able to captured by the image sensor. on the outside of the lens there is usually a three-ring, which ring the focal length (for variable type lenses), aperture ring and focus ring. there are 5 characters that lens, wide (wide), macros (enlarge), telephoto (zoom), tilt & shift and fish eye. and there are 2 types of lens fix (can not be changed, such as 50mm) and zoom (there rangenya like, 17-85mm). lenses also have a feature is (image stabilizer) to dampen vibration of the hand and USM (ultrasonic motor) to accelerate the search and silent focusing. * Code type is usm canon DLSR cameras. these features in any other DSLR camera lenses also exist, but the code name of the other but with the same function.
7. Lenshood = an addition on the lens to reduce excess light, the impact of flares and a protective front surface of the lens, and also as an addition to the display lens to look more frightening. * Remember: the use of hood that does not correspond to the series lenses will cause vignetting (vignetting = black spots on the sides of the tip of the image).
8. LCD monitor (LCD display) = to view images and monitor the results of modes that we use to take pictures.
9. Focal point = if you look into the viewfinder, then you'll see a tiny dots scattered (the number of points depending on the type and model of camera) where the focal point for helping you find focus images would be taken.
The sections above are the standard DSLR camera. Of course, each part can be utilized, so let's take the picture.
Read More >>

Selasa, 06 Maret 2012

Canon XF300 and XF305: Professional Camcorder for Professional Production.

Hello beraudiovisual's friends. It is not hot news, but it is important! Canon introduces two new professional camcorder, XF 300 XF 305 is a gift. Two of the latest innovations based camcorder professional video and film production for the article will be hired. Newcomers to the rank of this camcorder compact flash card (CF) can be written directly to the roll-out is a professional camcorder.

Combining video, audio and metadata into a single file, Canon 305 XF 300 and XF using MXF (Material Exchange Format), which is an open format. This format is useful to maximize compatibility with existing video non-linear editing system. Video recording format MPEG-2 Codec Canon also produces high-quality digital video with bit rates up to 50 Mbps. Specifically for Canon XF 305 is also equipped with features Genlock output terminal, Time Code and HD / SD-SDI terminal, which serves to produce a variety of video cameras and 3D films.

Canon Camcorder 305 XF 300 and XF uses MPEG-2 Full HD (4:02:02) file-based recording codec to produce a professional video with crisp detail at a resolution of 1920 x 1080p (Full HD). With three Canon original CMOS sensor ditanamkannya, both camcorders are claimed to produce digital video with natural color gradation.

Canon Camcorder XF 305 XF 300 and lens 4.1 mm - 73.8 mm lens equivalent to 29.3 mm - 527.4 mm in 35mm format camera. This lens has a 18x zoom ratio so that comes with Manual Focus mode can be set easily by the user. Canon also uses IP-UD Lens (Dispersion-High Index, Ultra Low) and aspherical which serves to reduce noise to provide a sharp color and compact size. Lens also is integrated with new forms SuperRange Optical Image Stabilizer system (OIS) feature Powered Dynamic mode and increase the performance of the sensor to produce a focus more quickly.
Canon-performance XF 305 XF 300 and feel much stronger because it comes with swappable dual card slots and UDMA CF card which allows file transfer to PC / laptop with you. To support the use of XF Codec Canon, Canon worked with major software developers like Adobe, Apple, fans and Grass Valley. This is to ensure unity between the camcorder with the software programs which are often used in film production, video production and broadcasting industry.


Canon XF300 and XF305

Another special two Digic III processor, professional camcorders use the DV required to capture the natural colors accurately. Innovative strength DIGIC DV III processor Face Detection technology, features, where users can specify the primary interface in the video group and automatically focus on the main page, even if the subject is moving.

Both camcorders are also designed for maximum comfort and flexibility. Design Canon 305 XF 300 and XF allows users to take video images without holding strong in the arm fatigue. Both are also equipped with LCD 4-inch 1.23 million dot resolution monitor that can rotate and can be placed anywhere, either right or left side of the body to further facilitate the camcorder also see the video taken of the position to make a video most difficult.
Visual Advantage XF 305 XF Canon camcorders. 300 and sound perfected by the flexibility offered. Features built in microphone and two XLR inputs it has external audio sources that can catch, so the resulting sound quality is clear and sharp sound. Canon XF XF 300 and 305 also supports 16-bit PCM audio at 48 kHz with a level of audio adjustments automatically and manually.
LCD monitors are both brand new camcorder also provides a display Built-in Memory waveform and Vectorscope to help achieve the level of exposure and color accuracy when shooting video. Not only that, the LCD monitor can also show the focus and zoom the image, allowing the user to confirm the object in HD format. Equipped with an electronic viewfinder 1.55-megapixel camera, professional video camera provides the highest resolution in its class for critical focus and 100 percent coverage in appearance.
Present through PT Datascrip as sole Canon products distributor in, Canon XF 300 priced at IDR 79.65 million. While Canon 305 XF marketed at a price of IDR 90.81 million.


Are you ready to be a Pro?


How beraudiovisual's friends? interested to use it?


Read More >>

Kamis, 23 Februari 2012

Simple Helicam, Combine The "Helicopter Remote Control" and Canon DSLR camera.

Hello beraudiovisual's friends. For you a crew of film production or television production, must be familiar with helicam. Helicam is a unique tool that can photograph or record images from a height, because the tool can fly. The principle of this tool is simple, and can even say there's nothing special, just like a regular camera placed on top of a toy helicopter. then we steer it. But the cameras used in Helicam this is not a regular camera, but Canon 7D DSLR cameras, in addition to the tool is also equipped with GPS (Global Position System) which allows us to continue to monitor the existence of this instrument when flying, and with a 5.8 GHz video monitor system , allows you to see every moment that was caught on camera this tool.
The Real Pro Helicam

The Real Pro Helicam


In a process to get the perfect shot, Eric Austin, a videographer who resides in Texas, found a neat way to combine the "helicopter remote control" and Canon DSLR cameras so he could air the video shoot with ease and get the kind of record that should be difficult to obtain. 

"I took a helicopter hobbyshop and modified to be fitted with a camera, so I can get a low altitude, the air close and tight shots," said Austin Wired.com.

An amateur videographer who became a pro, Austin is interested in photography remote control just four months ago.

 "As I do more photos and video, I realized I could develop a niche where I can use technological advances to provide the type of photos that most people can not get it easily," he said. 

Austin is one of the hobby photographer who finds a way to use a remote control toy airplanes and helicopters to get a more interesting camera angles. Wired magazine Editor-in-chief Chris Anderson in a site called DIY Drones where the user has found a way to use unmanned aerial vehicles to conduct aerial photographs. Last year, New York City photographer Anthony Jacobs showed a helicam built using German helicopter rig named MikroKopter. Jacobs uses helicam rig to shoot the video neighborhooods in the city. 

Austin, who has a website devoted to his RC helicopter videography, Saying he wanted to do something similar and offer quality HD video and photos. That is why, he said, he decided to create a rig that will be reliable and produce a type of recording that can be used by professionals. And as this clip shows, the video can be interesting. 

Aerial video with the Canon 5D, 7D AUSTIN helivideo.com from Eric on Vimeo.

Footage shot so far, Austin has helped to TV shows including the History Channel series of slices.
Austin started with a remote control helicopter called Align T-REX 700 and modified to carry a particular frame of the camera mount. He put tweaked landing gear for helicopters, covered with bright pink foam from "Noodles" is commonly used in swimming pools. 

"The color stands out when I fly outdoors helicopter," said Austin. "And if I hit the water, the equipment all my life will not go down. It will be destroyed, but at least I'll get my teeth back" Austin said.

He adjusts the camera settings when it's on the ground and pressing the Record button just before takeoff. For still images, Austin said he uses an external timer that activates the shutter every few seconds.

To create a video of the flying rig, Austin said he spent hours in online discussion forums at Helifreak.com.

"I do not know anyone to talk to," he said. "And then realized the only place to go is online where people discuss this."
Eric's Helicam

Eric's Helicam


One of the more challenging task of Austin has done with his helicam ie flying over a cliff about 25 meters high with a river below. And he did not destroy the helicopter.

"The likelihood that accidents will happen there, but so far, I have been careful," he said.
To download video, Austin has established a 5.8-GHz downlink the video feed using a wireless transmitter on-board.

All this does not come cheap. Austin estimates the whole rig cost him about $ 15,000. But for those at home, who want to do something similar, he says there are cheaper alternatives.
The results

The results of image shot from helicam.


"I go for the best and most expensive components because I do not want to risk it fails the air," he said. "But you can get an RC helicopter for about $ 400 and put the camera point-and-shoot on it."
Read More >>

Senin, 13 Februari 2012

Overcome 10 DSLR Disadvantages

New Revolution for Film Maker
Since Nikon introduced D90 in August 2008 as the first DSLR camera that shoots video High Definition (HD), a silent revolution taking place in the production of media. At a fraction of the budget creative camera people are capable of producing high-quality recording is outstanding-all with the build-out stills camera for a total investment of $ 7,500. This is good news for a film maker!


Result of DSLR Video (Trailer of "SAVING BROTHER" Directed by Rio Simatupang


The Visual beauty of the depth of field
A shallow DoF allows you to focus on the subject, leaving the rest of the focus. This isolates the subject from the background and allows you as a movie maker control where you want the audience to put their attention. If all sharp, the Viewer could easily be led astray by details not relevant to the story. And it just seems amazing.
Working with a shallow DoF is not easy: topics that move implies that to keep shortly taken you to the focus ring (also known as focus always) to keep.

Top 10 DSLR disadvantages & how to overcome them
If there is not bad at all when it comes to this way of production of the video? You betcha! However, there are also a growing number of ways of their solution. Let's take a look:

Audio
Second camera DSLR suck in the recordings. Built-in mic is miserable and the camera does not feature professional XLR input. In addition, should determine the automatic gain control (AGC) in the next firmware upgrade and allows at least on the screen for manual control of the levels of dB. In addition, there is no way you can monitor the sound through headphones, the LCD is turned off when you set a limit on the Canon 5 D head AV (7 D has different plug).  But then again, audio recording has never been the subject of the project. Enter magnification. H4N handheld recorder provides a DSLR-shooter simple device which, supplanting the sound recording, allowing for up to four independent channels at the same time (1 x front and 2 crossing stereo XLR input external mics). Synchronization takes place on the positions of the signal reference, such as clap hands or Clapper boards at the front of the camera. You should therefore key to keep the audio recording on a DSLR for a sound reference. And if you are editing Final Cut or Sony Vegas, enter PluralEyes (too bad I'm on Adobe Premiere Pro). If you want to manually control the audio on the camera itself, Magic Lantern firmware hack may be an option.

Stability
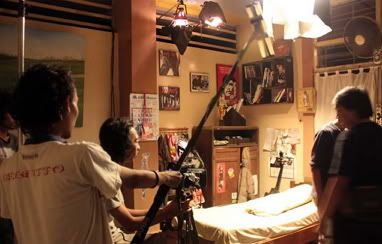
First of all, a stills camera is built to maintain constant for about 1/60 of a second, not to register or for more than 24 frames per second (i.e. shooting movies). Enter The Zacuto. This Chicago-based company, founded by people with a history in camera work, one after the other cranks innovation that helps DSLR shooters to stabilize their photos. Also: enter CineKinetic (or Visual departures). Using Mini-or BabySaddle (or SteadyBag much cheaper) allows you to create stable pictures even while moving objects such as a car, train, tram, bike plan or air. For those who like to go: enter the Glidecam. And for those who are ready for more pictures of dolly: enter the GlideTrack and WallyDolly. However, be careful with the movement too quickly as chips CMOS sensor offer some jello effect (see below).
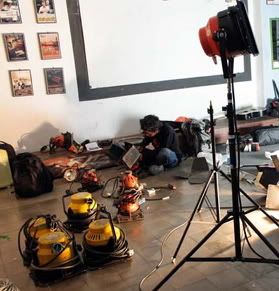
Light
DSLR cameras beat any camcorder, when it comes to low-light situations, fair and square. Nevertheless, and this applies to any type of camera with sufficient and correct amount of light is critical to the final result. Various vendors have entered this arena, offering useful equipment at interesting prices. Enter Dedo Ledzilla and Litepanel micro.

Display
In order to be able to judge sharpness, you need appropriate scenes. Because it is blocking the camera lens on a DSLR when entering live mode (i.e. required when shooting video), you need to see the details without scattering light from falling on the LCD screen. Enter (again) with the Zacuto Z Finder. Looking through the lens is not an option due to the position of the camera? There are alternatives such as the original 720 p LCD smalhed.

Filters
If you want to go to the shallow depth of field, you must open the iris on the camera. The stills camera this can easily lead to the exposure. Most photographers will be tempted to start to change the ISO or exposure time setting. The shutter must be stored in twice the frame rate, you shoot (e.g. 30 p – > shutter at 1/60, 24/25 p – > shutter at 1/50, 1/48 is not supported) to adhere to rules 180 degrees in film shutter. The best way to reduce incoming light: enter the neutral density filters from Singh-Ray (actually two circular polarization filters, merged into one). It gradually reduces the incoming light from 2 until 8 stops.

AVCHD Editing
DSLR cameras record in AVCHD format using the codec h. 264. Cineform Neoscene, creates intermediate format using wavelets to decipher those much needed intraframe image and reduces your CPU from having their calculation.

Rolling shutter or Jello effect 
In fact, this is a problem on most DSLR cameras. The effect occurs best when you pivot the camera quickly or enter part of fast moving objects. Solution: more slowly and in post speed not whip Pan – record. If this is not an option (such as you have people or moving objects in frame), exists to fix an after effects/Nuke plugin called RollingShutter. 

Compression against color
Although DSLR HD video sensor capable of recording full frames (35 mm) is used a lot of compression recording compact flash card. This means that the component video (4: 2: 2 or 4: 4: 4) are not normally available on the classification of the color and consist of a signal. This makes it difficult for color grading, chroma keying, Matte painting or Rotoscoping, enter more pain. However, the main classification of post-production color: enter the RedGiantSoftware. Using Magic Bullet looks makes it fast and efficient (or slow and comprehensively) of their shots. Philip Bloom explains. If you still want more: Cineform will help you through the process again to create a 4: 2: 2 intermediary file format. Not ideal but workable.

Recording the border
Limited to save on most DSLRs on the clock to five minutes for a single navigation. For what value from what I hear, this is something with the import restrictions. If they go beyond These products are not regarded as a stills camera, and a different tax categories. Another story tells that there is something to a 4 GB file size limit (partial support for 720 p will fix that). How do it in a comment there if you are recording live events, capturing most often is shorter than that of the most important things for the sake of coherence is to record sound correctly — you can fill in a gap in the post later with special ingredients, you kick before or after an event (or stills from a slide.) If you are recording a live presentation.

24/25 p and 30 p
To achieve this look cinema or film, recording video the way film is traditionally. The meaning of p 24 or full 24 frames per second. The planet is NTSC framerate 29, 97, while 25 in PAL markets. Snapshot initially thought players, you can change the world by going ar 30 (dadon, drop-frame) as a new standard for video. Erroneous. Because there are still way more TV cameras on the planet, this has been shown to be losing the battle from the outset. When matching to 30 pp 24 actually shooting slightly slow, or ask your output or combine frames. This gives a slightly notable visual effect, audio synchronization problems, as well as easily. Canon may be wrong, and start to correct it. D Canon 7 now supports different frame rates (24/25/50 in PAL)-24 30 60 in NTSC, while fixed long d 5 Mark II (hope?) is due for release in January 2010. Haya Canon, makes us more than happy!

The Conclusion of All
should go to DSLR or stay with (semi-) professional video device? My answer is that everything depends on what you're doing. The key is the comparison of time compared to the budget. Me, that work with DSLRs, as digital cinema, is probably better suited for those who have time to set things right, if only assured, are met, the disadvantages (read: check the subject of the audio and record sufficient background or set up noise!). Without stabilization device and manual audio recording may not be the best DSLR camera and when Obama wants to meet in the press for a quick interview. You may want to shoulder-mounted ENG camera to it. A typical price points, however, are not within the budget of most people. So, if no time is of the essence, with improved DSLRs is very, very attractive alternative.
Going to make you fly on DSLRs and filmmaker? No, because it takes a lot of practice, knowledge, talent and learning. Since recently WIRED correctly, "it may be expensive DSLRs, but talent is priceless". However, with at least the possibility of taking beautiful pictures, and more people started shooting (and actively promotes the Canon), high-quality content (even for 1080p) Web site that looks like it was created by using professional cinema equipment in explosive growth expected. And that's exactly what I business.

Beraudiovisual's friends, what about you?

Read More >>

Kamis, 09 Februari 2012

Tips and Tricks caring for video cameras


Hello beraudiovisual's friends. Do you have a Camera Video? There are a Tips and Tricks Caring for a video camera.  Tips and Tricks Caring for a video camera carried by the following six steps: 

1. Dont leave tapes in your camcorder when not in use. Tapes can cause friction and this can cause problems in the process of recording and playback

2. Do not put the tape video in really cold conditions. Moisturizers from the warm air can membut cassette attaches to the drum so that the damage can damage tapes and video heads


3. Do not leave the battery inside the camcorder when not in use. Some interesting camera battery energy in small amounts, but the constant so that can deplete the battery


4. Do not leave your camcorder tapes in the car is exposed to hot air


5. Do not put a label on the camcorder tape where the label is the possibility of opening the door opposite the cassette. This can cause the cassette comes in the camera


6. Treat your handycam to give it to a technician to clean the tape head when dirty.

Such treatments can make your camera more durable That must be considered in buying a video camera are:   

   1. Suit enough you hold the camera
   2. Are there manual settings for focus, aperture and white balance 
   3. How much resolution display systems
   4. How well does the image stabilizer
   5. What equipment is available 
   6. Is needed a memory card to store photos 
   7. Is there an analog and digital inputs 
   8. Does the lens have a true wide angle 
   9. Is the available inputs for microphone and headphones 
   10. How long the batteries can last
 

Video Camera How to choose the right note: 

1. Image Engine technology such as LCD, CRT, LDP and LCOS, choose an LCD
2. Resolution SVGA, XVGA, SXGA and UXGA, select a high-resolution SVGA
3. Brightness (lighting) with the size ANSI Lumens, select ANSI Lumens with a larger 
4. Connections affect the image quality VGA, RGB, RCA, S-Video, DVI, select the most complete 
5. Size (small big) Video Camera, select the size of a small
Read More >>

Selasa, 03 Januari 2012

The Cost of AudioVisual Solutions

Once you have your audio-video great concept, it's time to ask: What is the cost of audiovisual solutions to your sales site?

Video

How much should you spend on video equipment depends on what you need to register. If your page design calls for something more stimulating than video testimonials from satisfied customers or some sales pitch from an insider of a company, you can probably get away with a webcam and USB high-end special emphasis on some sounds and lights. If you want to shoot some footage of your product being tested or used in the field, you want to invest more money in a more comprehensive and powerful, something that gives you more interesting lighting options and you can save information in a variety of video formats.

Recording Equipment

All good car will probably be the microphone. No matter that the microphone is something you want to use or not is another matter. Most trains, micro cameras do not give you the ideal voice recording, and make it difficult to develop the final product. The microphone is usually very close to moving parts of the camera for a clear and continuous, leading to ring and disturb the general atmosphere of amateurism. So go cost effective solution for audio recording is not a good idea.

On the other hand, there is no real need to get more expensive in terms of registration. There are many microphones designed for the professional work of film and audio recording professionals. These microphones are designed to eliminate all background noise to capture the full fidelity audio signals, and generally provide the audience with his beautiful and charming. But here's the difference: to store movies and music are themselves the products they are trying to sell.

If you buy a CD of your favorite band and the record is horrible, you feel you have received an inferior product. If you look at a Flash presentation for an operating system with audio recordings doubtful, can not really draw conclusions about the product-what matters is not the clarity of sound, but how the product works in the team .

So the key is to get the audio recording equipment that provides high fidelity sufficient for you to hear all of your dialogue and music well, but that does not break your bank gives you a lot of growth and unnecessary "cherry" . A directional microphone that can often do the trick, and will not cost you more than about $ 20-40 depending on how complicated it is to connect your microphone to your computer, camera or other recording device.

With a little attention to the sound-recording (as discussed in a later chapter), you should not have more than unless you really focuses the sound as a key, or if we do something complicated your sales presentation (which can probably be reduced without any problems.)

It's generally a good idea to spend as much money as your budget allows, when it comes to a control device. After all, it is unlikely that the first Web-enhanced visual audio will be the last. You will have several ideas for products, and you have to build more sites to market and sell.
Read More >>